Patricia
Spirelli
PRODUCT // Spirelli product review for the best Zoodles
Do you like making spaghetti or noodles from zucchini, you can call them zucchetti or zoodles.
It’s a great way to add more vegetables do your meal.
The only problem is that they take longer to cook then regular pasta.
But now there is an easier solution. This product from Spirelli is made out of high quality organic ingredients. It’s also gluten free, vegan and contains no preservatives.
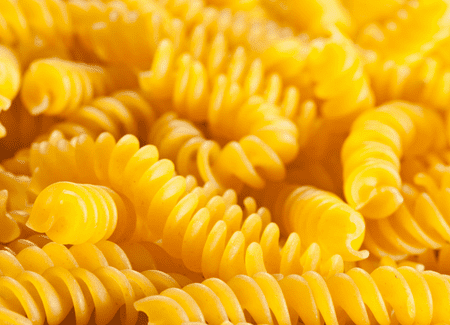
Spirelli
The first thing you should notice when opening the package is how light it feels. It’s not heavy at all and it doesn’t stick together. I love the fact that it comes in different sizes so you can choose what size you prefer.
I chose the medium one because it was perfect for my needs.
The texture is soft but firm enough to hold its shape while cooking. It has a nice taste and it’s super easy to use. All you have to do is peel off the skin and put it on the water. Cook it for about 10-15 minutes depending on the thickness of the zucchini. When done, drain and serve.
It’s really simple to make and it’s healthy.
I would recommend this product to anyone who likes to eat healthier meals.
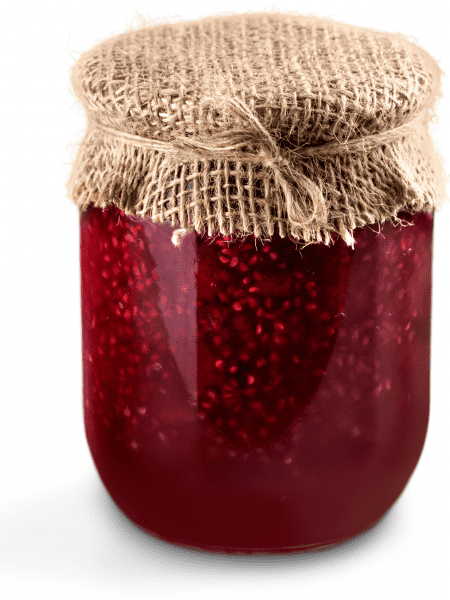
Berry Chia Jam
Wanting something fresh, naturally sweetened and very delicious to add to your breakfast bowl, toast or your favorite pancake? Try this berry chia seed jam. It takes less than five minutes to prepare, and includes chia seeds, which contain omega 3 fatty acids. You don’t need a stove for cooking.
Prep Time: 5 mins + Cooking Time: 0 mins = Total Time: 5 mins
Ingredients
2 1/2 cup or 250 gr mixed berries
3 tablespoons chia seeds
halve a lemon, juice
1 tablespoon maple syrup, optional
Recipe
1. Clean and puree the berries.
2. Mix in the chia seeds, the lemon juice and maple syrup.
3. Transfer the mixture to a jar and place in the fridge for at least 6 hours.
4. Add the jam to your breakfast bowl, slice of bread or anything you like and enjoy!
Conclusion
I hope you liked this recipe and that it helped you. Please share it with your friends, family and social media. Have fun experimenting with recipes and be creative!
Tofu Berry Cookies
Tofu in your sweet baking…
I’m not sure if you know this, but I love tofu. It’s one of my favorite foods and it has been for as long as I can remember. My mom used to make me a special meal called “tofu with rice” when I was little. She would boil some water, add the soybeans (which she soaked overnight), then drain. Then she would add the soybeans to a pot of boiling water and cook them for about 15 minutes. After they were cooked, she would take out the beans from the pot and put them on a plate. On top of the beans she would place some rice, some vegetables and a piece of meat. The combination of the different flavors was amazing.
When I got older I started making tofu myself. Tofu is a perfect and protein-rich ingredient to replace eggs in your most delicious cookies, cakes or pasties. Tofu has hardly any taste in itself and it will make your cake just creamier.
The other main ingredient in these cookies are the dried berries of Heart of Strandja. They specialize in organic dried fruit and because their fruit is dried at low temperatures, the fruits hardly lose any vitamins or minerals when drying. This is something that I really appreciate. Many thanks to Heart of Strandja for letting me try their natural products!
Prep time: 20 mins, Baking time: 55 mins,
Equipment Needed:
baking tin
food processor or immersion blender
Ingredients for 12 slices
3 bananas
1 1/2 cup or 300 gram silken tofu, puree
2 cups or 250 gram buckwheat flour
2/3 cup or 100 gram dried berries from Heart of Strandja
2 tsp Weinstein baking powder
1/4 cup or 50 gram coconut blossom sugar
1 lemon
coconut oil to grease
Spice mix
1 tablespoon ground cinnamon
half a teaspoon ground vanilla
a pinch of sea salt
Recipe
1. Preheat the oven at 325ºF (or 160ºC) and grease a baking form with some coconut oil.
2. Combine all ingredients except the dried berries into a food processor and run until smooth.
3. Add half of the dried berries to the batter and stir to combine.
4. Pour the batter into the baking form and finish with the other half of the dried berries.
5. Place the baking form in the oven and bake in 55 minutes golden brown and ready.
6. Let the form cool down, cut in pieces and enjoy!
Conclusion
This recipe is very easy to make and tastes great. If you want to try something new, give these vegan cookies a go! They are gluten free, dairy free and have no refined sugars.
If you enjoyed this, please let us know
Naan
This recipe is replacing the white flour for a spelt variant and adds coconut yogurt and psyllium husk to the batter. By doing so we add some healthy fats and fiber to our bread.
I have been craving for naan bread lately. This bread is very soft and fluffy and can be used as a sandwich bread or even as a pizza base.
Prep Time 10 mins + Cook Time 30 mins = Total Time 40 mins
Ingredients
1 cup (125 gr) spelt flour
1 tsp baking soda
1/2 tsp salt
1/2 cup plus 3 tbsp (150 ml) water
1/2 cup (120 ml) coconut milk
1/3 cup plus 1 tbsp (80 ml) olive oil
1 egg
1/2 tsp vanilla extract
1/4 cup plus 1 tbsp (60 ml) psyllium husks
Instructions
Pre-heat the oven at 400°F (200°C).
In a medium sized bowl combine the flour, baking soda and salt .
Add the water, coconut milk, olive oil, egg, vanilla extract and psyllium husks to the dry ingredients. Mix until it forms a smooth dough.
Transfer the dough onto a greased baking sheet. Bake in the preheated oven for 20 minutes.
Enjoy!
Equipment Needed
Baking Sheet
Measuring Cups
Note
* You can use any type of flour you like but I prefer using whole wheat flour because it has more nutrients than regular flour.
Cranberry Pear Crumble
A delicious dessert made from an easy to make, crumbled, sweet and sour mixture
When cranberries are mixed with the sweetness of baked pears, they create an amazing flavor combination. Finish off this fruit mixture with a sprinkle of oats, nuts and/or seeds for added crunchiness. Something very satisfying will come out of the oven.
Prep Time 15 mins + Cook Time 25 mins = Total time of 40 minutes
Ingredients
- 2 cups (400 gr) pears
- 2 cups (250 gr) fresh cranberries
- 2/3 cup (100 gr) mixed nuts
- 1/2 cup (75 gr) oat flour*
- 1 cup (75 gr) rolled oats
- 1/3 cup (50 gr) sunflower seeds
- 1/4 cup (50 ml) maple syrup
- 1 tbsp cinnamon
- pinch of sea salt
Instructions
- Preheat the oven at 350°F (or 180°C).
- Clean and cut the cranberries in half.
- Clean and cut the pears into quarters and then thinly slice. Add the pear and
cranberries pieces to an oven dish. - Toss the fruit pieces with 1/4 cup or 50 gram of the oat flour, 2 tablespoons of maple
syrup, cinnamon and sea salt. -
Put all the ingredients together in a large mixing bowl Stir the mixture well so that everything is evenly mixed. Add the mixture to your oatmeal.
- Transfer the dish to the oven and bake in 25 minutes ready. Enjoy!
Equipment Needed
- Oven Dish
- Mixing bowl
Notes
* Oat flour is easily made by adding oat flakes into a food processor and then process into a fine meal.
Buckwheat Risotto with Beets, Fennel and Mushrooms
Here’s a recipe made from buckwheat risotto with beets, fennel and mushrooms. It’s perfect for when you’re having dinner with friends. It’s easy to make in large quantities, plus your non-Vegan friends won’t miss out on any animal products.
The main ingredients are buckwheat groats (or arborio rice), chopped fennel, mushrooms, beets and red pesto. Fennel makes this dish taste fresh, the beetroot gives it sweetness, and the mushrooms add some flavor. And all these tastes are stirred into the cooked buckwheat groats which give a hearty touch and are packed with nutrients and antioxidants.
The other day someone asked me what are “groats.” It turns out that oats are whole grains used in cereals, breads and other baked goods. Groats are kernels that have had their outer hulls removed. They’re usually made into flakes or granules. These are known as steel cut oats because they’ve been sliced using steel knives.
Beets contain high concentrations of nitrates, which stimulate the body’s metabolic rate and can help aid weight loss. They also contain antioxidant compounds, including betalains, which have anti-inflammatory properties. Beets also contain probiotics which can help with digestive issues and improve gut health.
Beet Buckwheat Risotto
Prep Time 20 mins + Cook Time 30 mins = Total Time 50 mins
Serves 4
Ingredients
Vegetable Mixture
- 2 1/2 cups (500 gr) cooked beets
- 4 cups (250 gr) chestnut mushrooms
- 1 fennel
Buckwheat Risotto
- 1 cup (150 gr) buckwheat groats (or arborio rice)
- 2 tbsp red pesto
- 1 tbsp coriander powder
- half a tbsp cumin
- 1 tsp cardamom
- a pinch of sea salt & pepper
Topping
- half a fresh coriander (also known as Cilantro)
Instructions
Vegetable Mixture
- Clean and chop the mushrooms, fennel and beets into small and equal pieces.
-
Heat up a skillet on the stove, then add one tablespoon of extra virgin olive. After frying for five minutes, add the mushrooms and sautéed fennel. Cook for another 5 minutes until the liquid from the mushrooms has completely evaporated. Put into a bowl and set aside for later.
Buckwheat Risotto
- Add some new olive oil to the skillet and add the buckwheat groats/arborio rice. Toast for about 2 minutes over medium heat golden brown.
- Bring to simmer and add about 100 ml warm water at once to the pan. When the water gets absorbed by the buckwheat/arborio rice, add another 100 ml warm water. You will need around 600 ml water to cook the buckwheat/arborio rice tender.
-
Once the buckwheat groat/arborio rice mixture has been cooked, add all the remaining ingredients except for the salt and pepper to the mixture and stir to combine. Add the salt and pepper to taste.
- Reheat and when warm, serve with some coriander and enjoy!
Substitutions/Additions
You can add spinach to the Risotto. Some like to have spinach substituted for the fresh coriander (cilantro). Either way can work.
Equipment Needed:
skillet, bowl
Conclusion
I hope you enjoyed this recipe. I’d love to hear your feedback. If you try it, let me know how it turned out for you.
My Favorite Banana Granola
Banana Granola
Prep Time 10 mins + Cook Time 35 mins = Total Time 45 mins
Prepares 12 servings
Ingredients
- 1 tbsp chia seeds
- 1/4 cup (60 ml) water
- 2 1/2 cup (250 gr) rolled oats
- 1/2 cup (80 gr) almonds, / chopped
- 1/2 cup (80 gr) pumpkin seeds
- 1/4 cup (40 gr) sunflower seeds
- a pinch of sea salt
- 3 bananas, / ripe
- 3 tbsp rapeseed oil
Spices to select from…
- 1 tbsp ground cinnamon
- 1/2 tbsp ground anise
- 1/2 tsp ground vanilla
- 1/4 tsp ground cloves
Optional to taste…
- 3/4 cup (180 ml) almond milk
- half a banana or banana slices
Instructions
- Preheat the oven at 325ºF (160ºC) and cover the baking tray with parchment paper.
- Combine the chia seeds and the water and let them soak for at least 20 minutes.
- Mix all the dry ingredients into a large mixing bowl (including the spices).
- Combine the bananas and the oil and puree those into a smooth mixture.
- Add the wet mixtures (the banana and chia seeds) to the dry mixture and mix thoroughly.
- Spread the granola over the baking tray and bake for 15 minutes in a preheated oven.
- Remove the tray from the oven, stir the granola with a wooden spoon and place back in for an additional 20 minutes. Note: check on this throughout to avoid burning.
- Let the granola cool down and serve with the almond milk and the sliced banana. Enjoy!
Equipment Needed:
baking tray, mixing bowls
Ingredient Substitution and the Result
refined sugars => bananas, V + C
milk => almond milk, P
“bad” fats => rapeseed oil, V + S
too much salt => a pinch of sea salt
processed grains => rolled oats, nuts and seeds, F + V
Result of the Substition:
F = increase in fiber
V = increase in vitamins
C = cut in calories
P = plant-based swap
S = less saturated fat
Conclusion
The result was delicious and I am very happy with it. It is not only good for my health but also for the environment because it does not require any packaging. The best part is that it tastes great too. I hope you enjoyed reading about this recipe as much as I did writing it. Feel free to share your thoughts and ideas by leaving a comment below. Thanks for reading!
Sweet Potato Mac & Cheese
This recipe is dedicated to all the vegan cheese lovers! Yes, you read it right, this mac & cheese recipe contains no diary products. Where traditionally, cheese is a dairy product there are actually a number of plant-based replacement options, which even the most devoted cheese lover would satisfy.
Sweet Potato Mac and Cheese
Prep Time 15 mins + Cook Time 20 mins = Total Time 35 mins
Serves 4 people
Ingredients
Macaroni
- 2 1/2 cup (250 gr) dried whole grain macaroni
- 2 tbsp organic extra virgin olive oil, either USDA approved or non-GMO project approved
The “Cheese” Sauce
- 3 boiled sweet potatoes
- 1 chopped onion
- 4 minced garlic cloves
- 1 tbsp rapeseed oil to fry
- 1/2 cup (100 ml) coconut milk
- 4 tbsp nutritional yeast
- half a lemon to be squeezed
- 2 tsp dried thyme
- 1/4 tsp cayenne pepper
Vegan Parmesan
- 1/2 cup (80 gr) unsalted cashew nuts
- 2 tbsp nutritional yeast
- 1/4 tsp salt
- 1/4 tsp garlic powder
Instructions
Macaroni
-
Cook the pasta according to the instructions on the box and then add two tablespoons of extra virgin olive oil.
The “Cheese” Sauce
-
Cut the sweet potatoes into equal sized cubes. Put a pot of water on the stove so it covers the sweet potatoes. Add the sweet potatoes to boiling water. Cook the sweet potato for 15 minutes until tender. Turn off the heat and remove the pot from the stove. Drain the water.
-
Chop the onions and mince the garlic. Put a skillet on medium heat with 1 tablespoon of rapeseed oil and cook the minced garlic and chopped onions for two minutes until they turn golden brown.
-
Put all the sauce ingredients into a food processor and blend them together until they form a smooth mixture.
Vegan Parmesan
-
Toast the cashews until they’re golden brown in a nonstick skillet without any oil.
-
Put all ingredients into a food processor and blend them together until they’re roughly chopped. To add an extra crunchy texture, I prefer to chop them into smaller pieces.
-
Add the pasta to the sauce, stir well, then top with vegan parmesan and serve.
Equipment Needed:
pot, skillet, food-processor
Ingredient Substitution
The cheese in the recipe is formed from the cashew nuts, nutritional yeast and the sweet potato for the creaminess. Nutritional yeast has a strong nutty and cheesy flavor and can be used to substitute for cheese. In addition, you get nutrients like protein, vitamin B and zinc — all good things your body needs.
The combination of the cashew nuts and sweet potato will yield a creamy sauce, rich in flavor and yet it’s still plant based. The taste is good enough that you might even surprise your non-vegan friends.
If you don’t have access to raw cashews, you can use roasted almonds instead. You can also substitute other vegetables like carrots, peas, etc.
Conclusion
I hope this recipe is helpful! Let me know if you try it out and what your thoughts are about it.
Easy Rice Bowl
Rice Pudding Bowl
Looking for something else than your favorite oatmeal bowl in the morning?
This is a great way to get your kids involved in the kitchen and teach them how to make rice pudding! This recipe is also gluten-free, dairy-free, egg-free, nut-free, soy-free, vegan, vegetarian, and paleo.
Breakfast Rice Bowl
Serves 4 people
Prep Time 10 mins + Cook Time 10 mins = Total Time 20 mins
Ingredients
- 3/4 cup (150 gr) uncooked brown rice
- 3 apples
- 3 cups (700 ml) rice milk
- 3/4 cup (100 gr) pitted prunes
- 1 tbsp ground cinnamon
- 2 tsp ground fennel seeds
- 1 tsp ground anise
- 2/3 cup (100 gr) chopped walnuts
Instructions
Rice
- Wash the rice well and place in a saucepan, boil according to the package.
Apple Puree
- Clean and cut the apples and blend with the milk, add half a cup of prunes (not all of them), cinnamon, fennel seeds and anise until a smooth mixture.
- When the rice is ready, drain the water and add the apple puree. Reheat on middle high fire.
Garnish
- Chop the other prunes and the walnuts into small pieces.
- When the rice is warm, serve into bowls and add the remaining chopped prunes and walnuts. Enjoy!
Equipment Needed
blender
Ingredient Substitution
refined sugars => apples and prunes, F + V
milk => rice milk, P
processed rice => brown rice, F + V
too much salt => a pinch of sea salt
F = increase in fiber
V = increase in vitamins
P = plant-based swap
Conclusion
This is a great way to serve rice pudding, and it’s also a fun dessert for kids! You can make this in any size you want, but I recommend making the largest one you can fit into your refrigerator at once. This recipe makes enough for four people.
Keto Friendly No-Bake Raspberry Cheesecake
It’s grain-free, gluten-free and egg-free… and it’s Keto!
Raspberries and cheesecake? Need I say more? This Low-Carb Raspberry Cheesecake is extra special because it’s so yummy and grain-free, gluten-free, egg-free, and sugar-free along with gut-friendly bacteria! Perfect for the keto dieter.
Here’s a simple five-ingredient recipe for a delicious raspberry cheesecake. It’s made of vanilla custard (a mixture of eggs, milk, sugar, and cream), agar-agar (an edible seaweed). To make a vegan version of this dessert, substitute the gelatin for agar-agar.
Agar-agar is a red algae whereas gelatin is made from animal bones. Both are very healthy for the body.
The crust is made by rolled oats, medjool dates and a pinch of sea salt.
No Bake Cheesecake Recipe
This vanilla cheesecake is one example of many different variations of this cake. Sometimes, especially in the summer months, I’ve made this dish using different kinds of yogurt, fruits and topping options.
You can also experiment with the crust by adding different ingredients. For instance, replace the dates with raisins, add some raw cacau to the mixture, or an even healthier alternative would be using your favorite cookies instead of oatmeal.
Have fun!
Easy Raspberry Cheesecake
Here’s a simple recipe for a delicious and nutritious cheesecake with just five ingredients!
Equipment Needed
- sauce pan 2x
- spring-form
Ingredients
Crust
- 2 cups (200 gram) rolled oats
- 12 medjool dates, pitted
Filling
- 2 tsp (4 gram) agar-agar
- 4 cups (1 liter) vanilla custard, or vanilla yogurt
- 1 cup (150 gram) raspberries, cleaned
Instructions
- Add the crust ingredients plus a pinch of sea salt into a food-processor and run until everything is finely chopped.
- Leave the food-processor running and add tablespoons of water until the mixture starts to stick together.
- Grease a spring-from and equally press the mixture into the bottom of the spring-form.
- Mix the agar-agar with a cup of water in a pot and bring to boil. Leave boiling for 5 minutes.
- Heat the custard just a little in another pan on the stove but avoid boiling.
- When the agar-agar mixture is ready stir into the custard.
- Pour the filling into the spring-form and finish with the raspberries.
- Transfer the cheesecake to the fridge to set for about 1 hour and enjoy!
Need some more sweet inspiration…
For more healthy cake recipes, check out my other variants, including this sweet bread with poppyseeds, bananas and oranges. If you’re looking for a fruity, sweet, nectarine banana cake, then check out this recipe. But if you want something more chocolatey, check out this brownie with black bean frosting. Adding black beans to your brownies sounds strange at first but I challenge you to give them a go. You won’t notice the bean flavor when eating them, but you’ll eat an extra portion because they’re so healthy.
Because there is no such thing as too many raspberries in raspberry cheesecake, you can place as much raspberries into the cheesecake.
Share your Raspberry Cheesecake!
If you do make the healthy cheesecake recipe, feel free to leave a comment below. By doing this together, we can both learn from each other and inspire one another!